
Owning an electric shaver means you’ll have to dedicate a certain portion of your time behind its cleaning and maintenance.
But what if I told you that a spray cleaner saves tons of time in terms of your razor’s lubrication and cleaning?
My seven step guide on ‘how to clean your electric shaver using a spray cleaner and lubricant’ will teach you exactly that!
We’ll talk about efficiency here and understand the considerable factors so that shaver maintenance becomes a piece of cake for every groomer!
Tools and Materials You’ll Need

If you have the following tools set around you, you should be able to proceed with the cleaning and lubrication process using a spray cleaner!
- Electric shaver
- Spray cleaner and lubricant
- Cleaning brush
- Warm water (optional)
- Cloth rag or paper towel
So you can see, these are the common tools groomers usually use to clean out their electric shavers properly.
Step-by-Step Guide to Cleaning & Lubricate Your Electric Shaver with a Spray
Let me break down the procedure for cleaning your electric shaver using a spray cleaner and lubricant in seven easy steps!
Follow along to get this routine practised and inherited which will allow you to permanently incorporate it very easily!
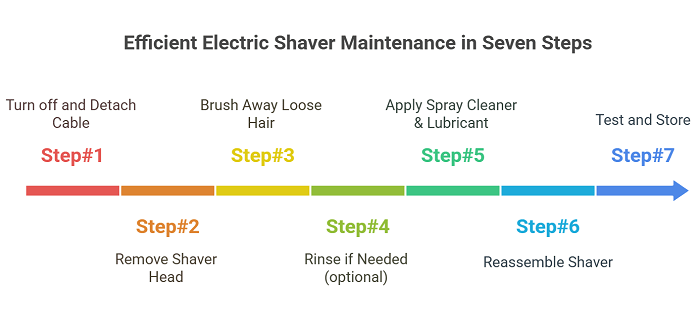
Step#1: Turn off and Detach Cable
For safety reasons, turn your electric shaver off and detach any cable attached to it. Also, remove guide combs from the blades.

While holding and moving your shaver around during cleaning, make sure you have enough clearance from the power switch.
Step#2: Remove Shaver Head
Different shavers have their unique models for shaver heads and the removal mechanism varies from one device to another, between higher blade count and lower.

Generally, you might locate a release button on one side (i.e. BaBylissPRO FoilFX02 or Andis ProFoil) or on both sides (for example: Panasonic ARC5).
You’ll have to press this lever and pull your shaver head outward. For other shavers, pulling the shaver head off of the hinges should do you the trick.
Still, it’s better to refer to the user manual for safer operations.
Step#3: Brush Away Loose Hair
Once the shaver head comes off, use your cleaning brush to dunk out stray hair from beneath the head.

Additionally, use the brush to remove dirt around the motor head and be thorough while cleaning the blades as well as the foils.
Step#4: Rinse if Needed (optional)
Those with a water-resistant or washable electric razor, feel free to rinse it under the tap. For a more thorough cleansing, you can pour warm water into a bowl.
Then, drench the shaver head into the water and vigorously shake it around. It will release the dirt from the crevices of the cutters.
If you have harsher residue, leaving it submerged for around 10 minutes should do you the trick.
Step#5: Apply Spray Cleaner & Lubricant
Now comes the most important part – grab your spray cleaner and hold it 3-5 inches away from your shaver head.

Evenly spray out the solution on either side of the blades, foil and the shaver head. A couple of puffs on each area will suffice.
If your spray cleaner contains a lubricating agent as well, your work here will be done. Otherwise, drop a couple of lubricant on the foils and blades to complete this phase.
Let it dry out first and move toward the reassembly phase.
Step#6: Reassemble Shaver
Pick up your shaver head and place it back into the crevices of the handle. Press gently until you hear a click that pushes the head in its hinge mechanism.

You may mop up the entire handle using the cloth rag to ensure your cleaning job has been a solid one.
Step#7: Test and Store
Turn your shaver on for a few seconds to let the lubricant spread out evenly and test if the motor noise has improved.

Once satisfied, store the electric shaver inside a safe, robust storage case and keep it in a moisture-free area.
And with these seven quick and easy steps, you’ll have completed the procedure for cleaning your electric razor using a spray cleaner and lubricant!
Top Spray Cleaner and Lubricants for Electric Shavers
I feel obligated to mention a few big names to be used as spray cleaner and lubricant for your electric razor. It’s worth noting that not all of these solutions contain lubrication.
- Braun Shaver Cleaning Spray: While it’s meant for Braun shavers, other electric razors may utilize it as well. It cleans, removes grease and odor but doesn’t lubricate.
- Philips Norelco HQ110 Cleaning Spray: Basically the perfect spray cleaner for all rotary shavers. Removes dirt and residue effectively and needs to be mopped after application. Doesn’t lubricate much.
- Wahl Clipper Oil and Blade Cleaner Spray: Specifically targeted for hair clippers, Wahl spray can also cater to electric shavers and trimmers. It not only shaves and prevents rust, but also lubricates the blades and cutting elements.
- Andis Cool Care Plus Spray: Andis’ solution is a 5-in-1 spray to clean, lubricate, prevent rust, disinfect and remove odor from the shaver cutters.
- Remington Shaver Saver Cleaning Spray: This spray is dedicated to foil shavers as it effectively cleans and lubricates the foil elements.
- Oster Blade Wash and Cleaner Spray: Meant for professionals and heavy-duty use, Oster spray lets you both spray and dunk the cutters depending on needs. Cleans and cools blades, little lubrication.
- Blade Buddy Cleaning and Lubrication Spray: This is a universal spray cleaner for every type of electric shavers and trimmers. It contains an alcohol-free solution for cleaning, lubricating and disinfecting the blades while keeping it skin-friendly.
It’s still better to check with the vendor of the spray cleaner to assess if it’s going to cater to your specific electric shaver.
Things to Consider When Choosing a Shaver Spray Cleaner
Here are a few things you should consider while picking a shaver spray cleaner so that your purchase generates the best outcomes for you.
- Compatibility: Checking for compatibility is a must. Other than contacting the vendor, you could read the user manual for a complete list of compatible device types.
- Functional Range: If you’re looking for a spray that both cleans and lubricates, be sure to check that out beforehand. Because a lot of the spray cleaners out there only cleans and doesn’t lubricate, so know your preference first.
- Ease of Use: Opt for sprays that are easy to use and don’t demand additional steps. This will save you a lot of time and effort.
- Price to Performance Ratio: Finally, analyze if the spray cleaner will be beneficial for you in the long run, including cost-effectiveness. If the spray turns out to be more expensive than other alternatives, it’d be wiser to reconsider your choice.
There you go! With these considerations in your mind, I hope you’ll be able to pick the perfect spray cleaner for your electric razor!
Final Thoughts
Time for us to part ways after a brief yet engaging discussion on cleaning your electric razor using a spray cleaner and lubricant.
If I must add, it’s worth mentioning that a spray cleaner will never replace your thorough cleansing routine, which you must run at least once a month.
Otherwise, spray cleaning could be the single greatest substitute when it comes to regular maintenance.
This will not only help out home groomers, but professionals at barber shops to increase their efficiency in-between shaves!