
Keeping your hair clipper neat and tidy at all times is one of the most important maintenance routines that not a lot of people will tell you about.
Cleaning rituals not only ensure your clipper blades remain sharp at all times, but also these tend to extend the lifespan of your blade and clipper life in general.
In this ‘how to clean hair clippers’ discussion, I will break down a six-step process you can easily try at home.
Whether you’re a home groomer or a barber, my cleaning method is going to guarantee that your hair clipper will remain in mint condition and always ready to deliver top performance!
Tools and Materials You’ll Need

To complete the procedure effectively and efficiently, here is a list of tools and materials you should situate around yourself:
- Cleaning brushes (can be of different sizes)
- Screwdriver
- Blade oil
- Warm water
- Blade cleanser
- Isopropyl Alcohol
- Microfiber cloth
- Blade disinfectant (optional)
Not all of these tools will be necessary for every cleaning session, but these are the general equipment you’re going to need for deep cleansing or regular maintenance.
How to Clean Hair Clippers? A Step-by-Step Process
In this section, let me elucidate on the step-by-step cleaning procedure for your hair clippers. If you’re not performing deep cleaning, simply skip the 3rd step.
Step#1: Unplug and Remove Attachments
At first, start off by unplugging your hair clipper from the power outlet to ensure both your and your hair clipper’s safety.
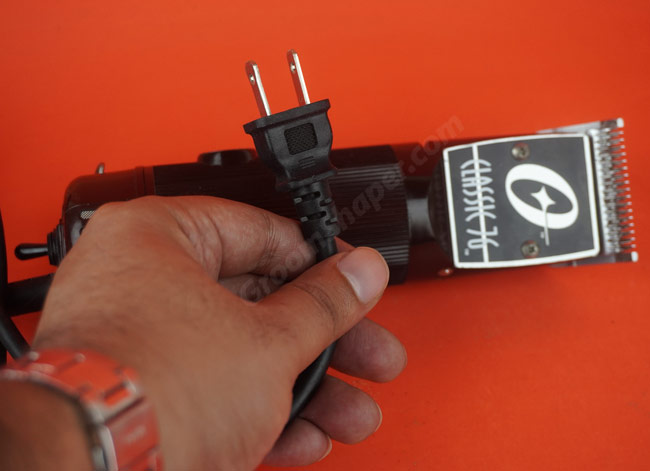
For cordless hair clippers, make sure your device is turned off and you don’t accidentally set it off in the middle of a cleaning session.
Then, remove any sort of attachment you might have on your hair clipper so that there’s less nooks and crannies containing dirt or hair particles.
After this, you may proceed to the following step to begin the cleansing.
Step#2: Brush Away Loose Hair
Pick a small brush, for example, those that come inside the hair clipper packaging. Use this brush to clean out the loose hair from the clipper blade crevices.

Your brushing animation should follow the direction of the blade – from the root toward the outward direction. This is the most efficient way to remove dirt easily.
For devices with an adjustment lever, be sure to move the lever around to release any hair particles that are stuck between the blade teeth.
As per the rest of the handle, mop it up using a cloth rag or paper towel as keeping the housing neat should also be a part of your cleaning routine.
Step#3: Deep Cleaning the Blades
If you’re looking for a deep cleansing, you may want to dismantle your clipper blades from the handle.

It’s different for each clipper, so follow the user manual provided with the device package. Generally, you’ll have to unscrew the blades to remove the entire thing unless it’s an Oster 76.
Once the blades are removed, take a bowl and pour some lukewarm water into it. Mix blade cleanser or any other cleanser that’ll turn the water foamy.
Drench the blade teeth separately in the water and keep them submerged for a few minutes. Bring in a cleaning brush – something like a toothbrush – and scrub the blades very gently.
Once you’re satisfied with your cleaning, you can take the blade teeth out of the water and mop them up using fiber clothes.
Finally, you’ll have to let the blade dry out completely. To fast forward this process, try using a blowdryer!
Step#4: Disinfect and Sanitize
Whether you’re a home groomer or a professional barber, your clipper blades are bound to pick up on fungi or bacteria from the scalp.

Oftentimes, even a thorough cleansing isn’t enough to get rid of them, therefore a proper disinfection task becomes an absolute necessity.
That’s where the isopropyl alcohol will come into play. Assuming it’s stored inside a spray tube, take each of your blades and spray out the solution on either side – a couple of puffs should suffice.
If you have access to any other blade disinfectants, those would work equally well. Let the disinfectant sit for a couple of minutes.
Then, using your cloth rag, mop the disinfectant liquid and dry out the blades before moving on to the next step.
Step#5: Lubricate the Blades
For avid hair clipper users, you should have the basic knowledge of oiling your hair clippers. Once you perform any sort of cleaning, lubricating the blades becomes a must.

Because cleansing the hair clippers tends to remove any sort of lubrication from the blades and leaves the device dry.
Therefore, you must apply a couple drops of lubricating oil on the blade teeth and spread it out using your fingers.
This step can also be performed after the reassembly, but with dismantled clipper blades – you can confirm whether the oil has been evenly spread out.
There exists a wide variety of hair clipper oils and their alternatives, pick one that caters to your particular device in the best possible way.
Step#6: Reassemble and Test
Finally, once all the cleaning and lubricating phases are completed and your device is fully dried out, time to put things back where they were.

During reassembly, be careful while aligning your clipper blades because a misalignment will not only compromise the quality of cuts, but also poses a risk of accidental nicks or tugs.
After putting things back together, turn your clipper on and run your finger around the blades to check if anything is out of the ordinary.
If you’re satisfied with the outcome, turn off your device and store it safely as your cleaning session comes to its very end.
Why Cleaning Your Hair Clippers is Essential
You might wonder why cleaning your hair clippers is so important. Here, I will discuss exactly why you must clean your hair clippers frequently.
- Hygiene: If you don’t clean your hair clipper on a regular basis, the blades will play host to different sorts of fungi or bacteria, leaving your scalp vulnerable to infections. Cleaning your clipper is the only prevention for the issue.
- Performance: A clean hair clipper offers better performance than an unclean one. As the blades are unclogged and the motor heads deliver power most efficiently, your clipper will deliver the maximum performance without any hiccup.
- Longevity: Cleaning your hair clipper extends the life of your device in the long run. Those who don’t cleanse their clipping devices regularly end up having to replace the tool more frequently than those who do.
- Cost-saving: As a hair clipper owner, you know that the blades must be replaced once they start dulling out. However, regularly cleaning your blades slows down this process and the sharpness is retained for a longer duration, thus your purchase frequency will be much less.
These are the four important incentives of cleaning your hair clippers. There are even more, but the mentioned ones should be sufficient to encourage taking up a regular cleaning routine!
FAQ
Not everything can be covered in the span of a compact discussion, therefore I am answering the following FAQs on ‘how to clean hair clippers’ to shed further light on the matter.
Q: How often should I clean my clippers?
Ans: You should clean your hair clippers after every grooming session. Yes, you’ve heard me right. It doesn’t have to be a deep cleansing, simple brushing and lubrication should do the trick. As per thorough cleansing goes, you should perform that once a week if you’re a professional, or once every two weeks for home grooming.
Q: Can I use WD-40 instead of clipper oil?
Ans: WD-40 is an industry-grade lubricating agent used widely in trucks or heavy vehicles. I do not recommend using WD-40 instead of clipper oil as these are thicker in density and will cause your blades to slow down.
Q: What’s the best way to clean rusted clipper blades?
Ans: Cleaning your rusted clipper blades isn’t a straightforward task but it’s not impossible either. In short, you’ll have to remove your blades and soak them in vinegar. Then, vigorous scrubbing actions must take place using steel wool or tough brushes. You may even make use of sandpaper but it tends to compromise the integrity of your clipper blades.
Final Thoughts
By this point of my elucidation on ‘how to clean hair clippers’, you probably have developed the idea on its importance and frequency.
Regular cleansing not only enhances the performance of your hair clippers, it ends up saving your cost in the long run.
If you manage to carry out the cleaning routines regularly, you might not need professional servicing at all!
The method I’ve given you is very cheap and anyone with the basic hair clipper knowledge should be able to pull this off effortlessly!