
If your hair clipper blade starts to show signs of red build ups, there’s a good chance it has started to rust.
Should this continue, your blades will lose their original properties and end up in a far worse state, unable to function at all.
Also, using a rusty clipper blade can cause all sorts of health hazards, not to mention the compromised sharpness will keep dragging or pulling your hair.
Therefore, knowing how to remove rust from clipper blades or prevention measures for the future will enhance your clipper’s life longer than expected!
Why Do Clipper Blades Rust?
There are plenty of reasons why hair clipper blades rust. Some of the major reasons are as follows:
Moisture: Moisture is the main killer when it comes to hair clipper blades. A humid environment can easily cause the oxygen atoms to react with the metal components of the blades and start the rusting process.
Improper Storage: Another reason for rusting is improper storage. By this, I mean leaving the hair clipper around without the box or placing it near a water source like your faucet.
Lack of Maintenance: Maintaining your hair clipper prevents rusting and without a proper maintenance routine can easily leave your clipper blades prone to rusting.
Hair Clipper Blade Material: Sometimes, there are certain elements to a clipper blade that are simply vulnerable to rust if you don’t exercise delicate care. These materials are usually steel or even stainless steel, leaving carbon or high-carbon steel toward a slightly safer gradient.
So, now you know the reasons why your clipper blades rust. Once we learn the removal process, we may even spend some time comprehending the prevention as well!
Preparing for Rust Removal
The preparation mostly takes care of the safety concerns associated with hair clipper rust removal procedure.
Firstly, you MUST unplug your hair clipper from the power outlet before starting the process. Otherwise there would be risk of electrocution.
Then, wear a thick, water-resistant pair of gloves to protect your skin from the harshness. Lastly, gathering all the tools and supplies at arm’s reach can help speed up the rust removal process.
Supplies You’ll Need

Here is a rough list of supplies you’ll be needing to remove rust from hair clipper blades. These aren’t the only solutions you could explore, but the ones I’ve so far found to be very useful.
- White vinegar/rust remover
- Baking soda (optional)
- Toothbrush or small wire brush
- Soft cloth or paper towels
- Lubricating oil (e.g., clipper oil or WD-40)
- Bowl/container
6-Step Guide: How to Remove Rust from Clipper Blades
Let me dive into the steps you’ve been waiting for – a step-by-step guideline that’ll teach you the way of rust removal without damaging your clipper blade!
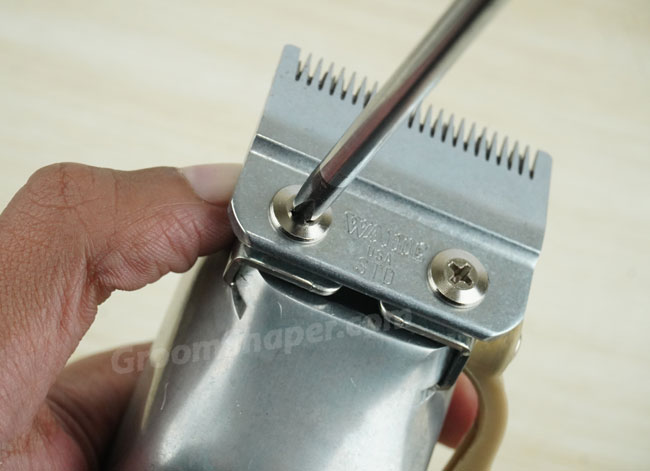
Step 1: Disassemble the Blades
Most of the modern hair clippers these days let you disassemble the blades. Figure out how yours is disassembled and the teeth are separated from one another.
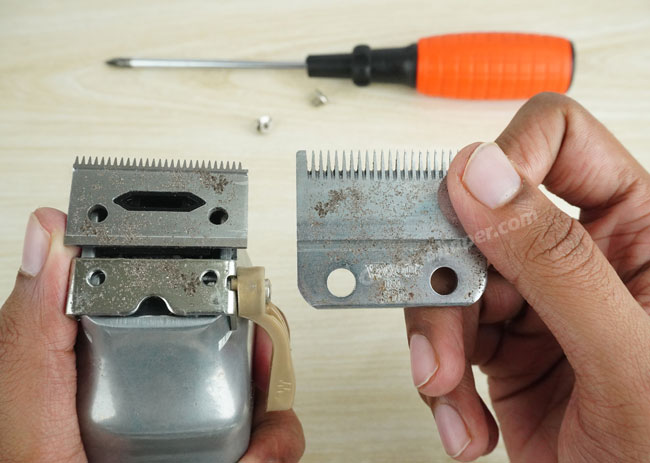
Some are detachable while others require you to unscrew the blades. Searching your specific clipper device on YouTube or Google should help you out with this.
Step 2: Soak the Blades
Pick out a bowl or a container and pour in white vinegar. In general, white vinegar is a great and natural rust-fighting agent.

If you want to level up, you may choose a commercial rust remover but that might cost you significantly more.
Once poured in, you have to submerge the blade teeth fully into the solution. The soak time depends on the degree of rust.
For Light Rust: You may have to submerge your blades for around 10-15 minutes if the rust levels are toward the lighter gradient.
For Heavy Rust: If you have dense or heavy rust on the blades, try submerging the blades between 20-30 minutes.
Those who own gel style rust remover, you may directly apply the gel onto the blades without submerging. Using a cotton bud or a swab to spread the gel out should be helpful.
Step 3: Scrub off the Rust
Once the soaking is done, grab your toothbrush or the hard wire brush or even steel wood and start scrubbing on the rust gently.
If your soaking was done correctly, the rust should be loosened up enough to be removed with lighter strokes.
While you should be thorough around the corners and angles, don’t scrub too hard. You don’t want to damage the natural properties of the blades.
For the extra rusty spots, you should apply baking soda on those particular areas before you start scrubbing.
Step 4: Rinse & Dry the Blades
Once you’re satisfied with the results, it’s time for you to rinse the blades. If you used vinegar or baking soda, rinse using warm water.

Otherwise, for commercial products, it’s better to follow their particular guidelines for rinsing. Then comes drying the blades.
Use a towel or cloth rag to mop up the blades and remove every bit of moisture. Make sure to be thorough, because every bit of water droplet comes with the potential to cause rusting again.
To ensure complete dryness, use your hair dryer to dry out the blade teeth. Do that especially around the screws or tighter areas between the blade teeth.
Step 5: Polish/Lubricate
Polishing the blades ensures that the teeth remain rust-free for a long time in the future. Also, it smooths out the blade operations and the hair clipping becomes very smooth.

To polish, apply a few drops of clipper blade lubricant or light machine oil on the blades. Wearing your gloves, spread the solution evenly across the blade and its teeth.
This layer protects your blade teeth metal from external moisture and thus keeps things safe in the long run.
Step 6: Reassemble
Now, reassemble your clipper blades back to how things were. Whether you took a picture of the initial orientation or wish to follow a video guideline, it’s all up to you.
Make sure that the blade teeth align perfectly, otherwise it might cause discomfort while trimming, or even cuts on the skin.
Tighten your screws enough to prevent dangling, but not too tight as it could compromise the cutting performance of the device.
Once done, plug in your hair clipper and turn it on, let it run for a minute or two to see if things are smooth. Then, glide over your skin to check whether everything is in order.
And these 6 easy steps should remove all the rust from your clipper blades and enhance its life cycle!
Alternative Methods for Rust Removal
In case you don’t wish to use things like vinegar, soda or commercial cleaning agents, there are a few alternatives you could explore. Note that these might not be as effective as the ones I’ve mentioned.
- Lemon Juice & Salt: Squeezing out lemon juice and mixing some salt into it works as a viable alternative. Once the mixture is ready, submerge the blade teeth for an hour to start seeing results.
- Baking Soda Paste: You can make your baking soda into a paste and apply a thick layer on either side of the rusty clipper blade teeth. Leave that on for half an hour before washing it off. Use a brush to get all the rust along with the soda layer.
- Sandpaper or Steel Wool: If the rust level is too heavy, you may consider using sandpaper to grind off the rust, similar can be done with steel wool.
It’s worth mentioning that this method could damage the blade’s natural properties and might even leave the teeth sharper than the safe threshold. So explore this only if it’s absolutely necessary and you know what you’re doing.
How to Prevent Hair Clipper Rust in the Future
There are a few tips I could leave you with so that you can prevent your hair clipper blades from rusting in the future.
- Clean the blades properly after each use, with a thorough cleansing per week
- If you wash the blades, you must dry them fully before storage
- Lubricate the blades on a regular basis
- Store the hair clipper in a safe, moisture-free area
When to Replace vs. Clean Hair Clipper Blades
Not every rusted blade is salvageable and some are beyond recovery. So you must learn when to clean the blades and when to replace it fully.
There are signs that tell you when to replace the blades: deep pitting, excessive dullness, bent or warped blade teeth, consistent hair pulling, overheating motor etc.
Another consideration is the cost. You have to assess whether buying all the rust removal supplies costs more or less than blade teeth replacement.
If the price difference isn’t significant, I’d rather say you should go for a full replacement.
FAQ
This FAQ section answers a few more queries regarding rusted hair clipper blades.
Q: Can rusted clipper blades damage hair?
Ans: Yes, rusted hair clipper blades can not only damage your hair, but also cause fungal or bacterial infections. In extreme cases, there’s a risk of tetanus caused by rusted blade-induced cuts on the scalp.
Q: How often should you clean and oil your clipper?
Ans: Ideally, you’d want to clean and oil your hair clipper blades after every use. You might leave the thorough cleansing once every week. However, barbers must conduct thorough cleansing and oiling at the end of each workday.
Q: How to safely store your hair clipper?
Ans: Safe storage implies putting the hair clipper inside a solid package, preferable away from moisture. You can put in some silica gel packs and an airtight lid to keep all the rust-inducing elements away.
Final Thoughts
The 6-step guide on how to clean rusting clipper blades should render your existing clipper to an almost brand new condition.
That said, you must assess whether you can salvage your blade because if not, the investment on the solutions might all be a waste.
Lighter to mid-grade rust can be removed from standard hair clipper blades using the methods I’ve shared with you, so keep scrubbing till your blades are all shiny and smooth!